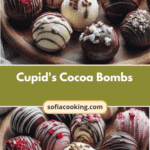

There’s something truly magical about the way chocolate can bring people together, especially on chilly evenings when a warm hug feels just as necessary as a comforting drink. That’s why I’m so excited to share my recipe for Cupid’s Cocoa Bombs—a cozy little treat that has quickly become a favorite in my Monterey kitchen. These delightful spheres of rich chocolate and decadent cocoa powder remind me of the gatherings around my Nonna Rosa’s kitchen table, where the air always smelled of roasted garlic and fresh herbs, but where dessert was never far behind. Whether you’re making these with your kids or whipping them up as a surprise for someone special, Cupid’s Cocoa Bombs are a heartfelt way to share warmth and sweetness in every sip.
Table of Contents
Why You’ll Love This Cupid’s Cocoa Bombs
Growing up in a household where every meal was an act of love, I’ve learned that the simplest ingredients often create the most memorable moments. Cupid’s Cocoa Bombs capture that spirit perfectly. These little chocolate spheres aren’t just about indulgence; they’re about nostalgia, comfort, and a touch of whimsy. I remember teaching my daughters, Olivia and Isabella, how to melt chocolate without scorching it—a skill I picked up from Elena, my mother, who always found joy in kitchen experiments. This recipe is approachable for busy home cooks but offers that special homemade charm that store-bought hot cocoa just can’t match.
What makes Cupid’s Cocoa Bombs stand out is their versatility. You can fill them with classic cocoa mix, marshmallows, or even a pinch of cinnamon or chili for a little kick—my Nonna Rosa adored adding spices to her desserts, always saying, “A little fire keeps the heart warm.” Plus, watching the chocolate shell melt and release the cocoa in a warm mug is a tiny moment of magic that never gets old.
Ingredients You’ll Need for This Cupid’s Cocoa Bombs

- 8 ounces high-quality semi-sweet chocolate (or use dark chocolate for a richer flavor)
- 1 cup powdered sugar
- 1/2 cup unsweetened cocoa powder
- 1/4 cup powdered milk (or substitute with coconut milk powder for a dairy-free option)
- 1/4 teaspoon salt
- 1/2 teaspoon pure vanilla extract
- Mini marshmallows (about 1 cup, optional but highly recommended)
- Optional spices: 1/4 teaspoon ground cinnamon or a pinch of cayenne pepper for a spicy twist
Nutrition Facts
- Calories: Approximately 180 per cocoa bomb (serving size: 1 bomb with 8 oz milk)
- Protein: 3g
- Fat: 9g (mostly from chocolate)
- Carbohydrates: 24g
- Fiber: 3g
- Sugar: 18g
- Sodium: 60mg

Cupid’s Cocoa Bombs A Decadent Treat to Warm Your Heart
Learn how to make delicious Cupid’s Cocoa Bombs. Easy recipe with step-by-step instructions.
- Total Time: 45 minutes
- Yield: 4 servings 1x
Ingredients
- 8 ounces high-quality semi-sweet chocolate (or use dark chocolate for a richer flavor)
- 1 cup powdered sugar
- 1/2 cup unsweetened cocoa powder
- 1/4 cup powdered milk (or substitute with coconut milk powder for a dairy-free option)
- 1/4 teaspoon salt
- 1/2 teaspoon pure vanilla extract
- Mini marshmallows (about 1 cup, optional but highly recommended)
- Optional spices: 1/4 teaspoon ground cinnamon or a pinch of cayenne pepper for a spicy twist
Instructions
- Begin by finely chopping the chocolate. This helps it melt evenly, a trick I learned while watching my grandmother patiently temper chocolate for her holiday desserts.
- Using a double boiler or a heatproof bowl over simmering water, gently melt the chocolate until smooth and glossy. Be careful not to let any water get into the chocolate—it can seize up quickly.
- Pour a tablespoon of melted chocolate into each cavity of a silicone sphere mold. Use the back of a spoon or a small brush to spread the chocolate evenly around the sides, creating a thin shell. Place the mold in the freezer for about 10 minutes to set.
- Once the shells are firm, carefully add about one tablespoon of the cocoa mix (powdered sugar, cocoa powder, powdered milk, salt, and vanilla extract combined) and a few mini marshmallows into half of the spheres. For a fun twist, sprinkle a little cinnamon or cayenne if you like.
- Warm the remaining melted chocolate slightly if it has hardened, then seal each filled half with a layer of chocolate. Smooth the edges to join the halves and create a sealed sphere. Chill the bombs again for 15 minutes until firm.
- To serve, heat 8 ounces of your favorite milk (dairy or plant-based) until steaming hot but not boiling. Place one Cupid’s Cocoa Bomb in a mug and pour the hot milk over it. Watch as the chocolate melts, releasing the cocoa mix and marshmallows into a luscious cup of hot chocolate.
- Prep Time: 15 minutes
- Cook Time: 30 minutes
- Category: Main Dish
- Method: Cooking
- Cuisine: International
Steps to Create Your Cupid’s Cocoa Bombs
- Begin by finely chopping the chocolate. This helps it melt evenly, a trick I learned while watching my grandmother patiently temper chocolate for her holiday desserts.
- Using a double boiler or a heatproof bowl over simmering water, gently melt the chocolate until smooth and glossy. Be careful not to let any water get into the chocolate—it can seize up quickly.
- Pour a tablespoon of melted chocolate into each cavity of a silicone sphere mold. Use the back of a spoon or a small brush to spread the chocolate evenly around the sides, creating a thin shell. Place the mold in the freezer for about 10 minutes to set.
- Once the shells are firm, carefully add about one tablespoon of the cocoa mix (powdered sugar, cocoa powder, powdered milk, salt, and vanilla extract combined) and a few mini marshmallows into half of the spheres. For a fun twist, sprinkle a little cinnamon or cayenne if you like.
- Warm the remaining melted chocolate slightly if it has hardened, then seal each filled half with a layer of chocolate. Smooth the edges to join the halves and create a sealed sphere. Chill the bombs again for 15 minutes until firm.
- To serve, heat 8 ounces of your favorite milk (dairy or plant-based) until steaming hot but not boiling. Place one Cupid’s Cocoa Bomb in a mug and pour the hot milk over it. Watch as the chocolate melts, releasing the cocoa mix and marshmallows into a luscious cup of hot chocolate.
Tips for Making the Best Cupid’s Cocoa Bombs
One of my fondest memories from childhood was standing on a flour-dusted stool, helping Nonna Rosa knead dough. That hands-on experience taught me patience and precision, both of which are essential when crafting these cocoa bombs.
- Use high-quality chocolate. The flavor shines through in the final drink, so don’t skimp here. I always recommend a chocolate with at least 60% cocoa content.
- Make sure the chocolate shells are thick enough to hold their shape but not so thick they take forever to melt. About 1/8 inch thickness works best.
- Work quickly but gently when sealing the bombs to avoid cracks. A warm spoon or a bit of melted chocolate on your fingers helps smooth the edges.
- If you don’t have silicone molds, you can use small round ice cube trays or even shape the chocolate by hand, though molds give the most polished look.
- For extra fun, involve kids in filling the bombs. Olivia and Isabella love choosing their own mix-ins—sometimes even adding tiny candy hearts for Valentine’s Day!
Serving Suggestions and Pairings

In my Monterey kitchen, Cupid’s Cocoa Bombs are more than just a drink—they’re an experience best enjoyed with good company. I recommend serving them alongside a plate of biscotti or your favorite shortbread cookies. The crunchy texture pairs beautifully with the creamy, rich cocoa. Learn more: Indulge in the Ultimate Cup of Hot Chocolate Topped with Whipped Cream
For a grown-up twist, try adding a splash of peppermint schnapps or a shot of espresso to your hot milk before pouring it over the bomb. It’s a little indulgence that feels both festive and decadent.
During family gatherings, I like to set out a hot cocoa bar with different toppings: whipped cream, crushed peppermint, cinnamon sticks, and even a sprinkle of sea salt to enhance the chocolate’s depth. It turns a simple cup of cocoa into a celebration.
Storage and Reheating Tips
Cupid’s Cocoa Bombs keep well if stored properly. Pack them in an airtight container in a cool, dry place away from direct sunlight. They’ll last up to two weeks this way—perfect for making ahead of a cozy weekend or holiday treat.
If you want to keep them longer, refrigeration is fine but bring them to room temperature before serving. Avoid freezing, as the moisture can cause the chocolate to bloom and lose its silky texture.
When reheating, remember these bombs are designed to melt in hot milk, not on their own. So, simply place one in a mug and pour warm milk over it. If you’re short on time, microwave your milk until hot, but don’t boil it, or you might lose that smooth, velvety taste that makes a cup truly comforting.
Frequently Asked Questions
What are the main ingredients for Cupid’s Cocoa Bombs?
The main ingredients for Cupid’s Cocoa Bombs include the items listed in our ingredients section above. Each ingredient plays a crucial role in achieving the perfect flavor and texture.
How long does it take to make Cupid’s Cocoa Bombs?
The total time to make Cupid’s Cocoa Bombs includes both preparation and cooking time. Check the recipe card above for exact timing details.
Can I make Cupid’s Cocoa Bombs ahead of time?
Yes, Cupid’s Cocoa Bombs can often be prepared in advance. Store it properly in an airtight container in the refrigerator and consume within the recommended timeframe.
What can I serve with Cupid’s Cocoa Bombs?
Cupid’s Cocoa Bombs pairs well with various sides and accompaniments. Consider the serving suggestions mentioned in the recipe for the best dining experience.
Is Cupid’s Cocoa Bombs suitable for special diets?
Depending on the ingredients used, Cupid’s Cocoa Bombs may be adapted for various dietary needs. Check the ingredients list and consider substitutions as needed for your dietary requirements.
Final Thoughts
Creating Cupid’s Cocoa Bombs has become a lovely ritual in my household, a way to pause and share a little sweetness amid the busy rhythms of daily life. I cherish these moments, especially when cooking alongside my daughters, teaching them to appreciate the beauty of simple, heartfelt food. These cocoa bombs are more than a recipe; they are a tribute to the women who taught me that cooking is an act of love, a legacy passed down through flour-dusted hands and warm smiles.
“Food has a language of its own,” my Nonna always said. “It speaks of home, family, and the stories we carry.” With Cupid’s Cocoa Bombs, I hope you’ll find a little piece of that magic to share with those you love.